
I decided to test some SQL 2019 (still in CTP 3.2) features. Since I don’t want to install the CTP version on my regular machines I was thinking about a hosted VPS. Usually all hosting companies charge some money for the OS (Windows server) and I realized that it could be nice to try something totally different.
My knowledge about Linux is basic (almost no knowledge) and in this article I will start from scratch (a blank Ubuntu machine) and step by step try to get a working SQL server on Linux. Wish me luck :)
The platform
I have a blank VPS machine with Ubuntu 16.04. Also, other platforms are supported (Red Hat, SUSE, etc.) but for no special reason I decided to try it on the Ubuntu distribution. The whole list of supported platforms by MS SQL server can be found on SQL Docs here.
Connecting to Linux server
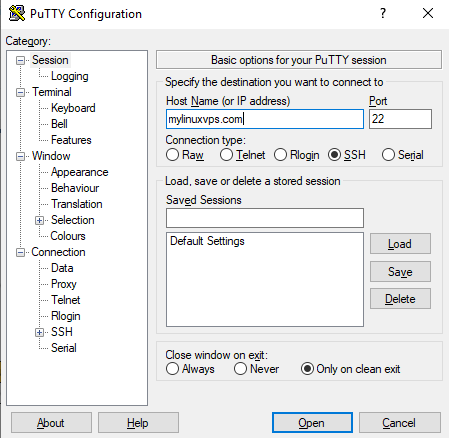
To be able to connect to a Linux server you need a client. I recommend you use the free client PuTTY that you can download here.
The interface is simple. Just under “Host Name (or IP address)” type your host name (or IP address), choose the default port (usually 22) and under connection type choose “SSH”. You can also save the connection for later. After typing all the required information’s, just click on “Open”.
You will get a command prompt like window. Enter your credential data and that’s it!
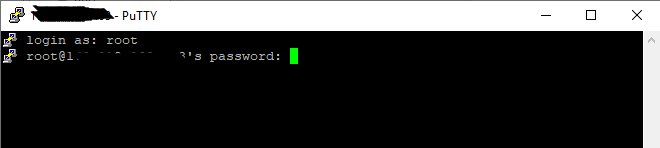
Here is the output:
login as: root
root@xxx.xxx.xxx.xxx's password:
Welcome to Ubuntu 16.04.6 LTS (GNU/Linux 4.15.0-58-generic x86_64)

 * Documentation:  https://help.ubuntu.com
 * Management:     https://landscape.canonical.com
 * Support:        https://ubuntu.com/advantage

The programs included with the Ubuntu system are free software; the exact distribution terms for each program are described in the individual files in /usr/share/doc/*/copyright.

Ubuntu comes with ABSOLUTELY NO WARRANTY, to the extent permitted by applicable law.

root@vmi291775:~#
Prerequisites
First, you need to tell Ubuntu to trust the MS SQL Server repositories (public repository GPG keys). To be able to do this you must import the GPC keys:
sudo sh -c "curl https://packages.microsoft.com/keys/microsoft.asc | sudo apt-key add -"
Here is the output:
root@vmi291775:~# sudo sh -c "curl https://packages.microsoft.com/keys/microsoft.asc | sudo apt-key add -"
  % Total    % Received % Xferd  Average Speed   Time    Time     Time  Current
                                 Dload  Upload   Total   Spent    Left  Speed
100   983  100   983    0     0   2237      0 --:--:-- --:--:-- --:--:--  2239
OK
root@vmi291775:~#
To be able to transfer data from or to a server you need to install the “curl” tool.
sudo apt-get install curl
Here is the output:
root@vmi291775:~# sudo apt-get install curl
Reading package lists... Done
Building dependency tree
Reading state information... Done
curl is already the newest version (7.47.0-1ubuntu2.13).
0 upgraded, 0 newly installed, 0 to remove and 0 not upgraded.
root@vmi291775:~#
In my case I already have curl installed but you can do it just to be sure that you have it.
Next step is to add the “add-apt-repository” utility to the Ubuntu machine. Add-apt-repository command is under the package software-properties-common and you need to install this package in order to install add-apt-repository.
sudo apt-get install software-properties-common
Confirm the prompt with “Y” and the package should be installed.
The output is large but here is a part of it:
root@vmi291775:~# sudo apt-get install software-properties-common
Reading package lists... Done
Building dependency tree
Reading state information... Done
The following additional packages will be installed:
  powermgmt-base python3-pycurl python3-software-properties
  unattended-upgrades xz-utils
Suggested packages:
  libcurl4-gnutls-dev python-pycurl-doc python3-pycurl-dbg bsd-mailx
  default-mta | mail-transport-agent needrestart
The following NEW packages will be installed:
  powermgmt-base python3-pycurl python3-software-properties
  software-properties-common unattended-upgrades xz-utils
0 upgraded, 6 newly installed, 0 to remove and 0 not upgraded.
Need to get 199 kB of archives.
After this operation, 1,322 kB of additional disk space will be used.
Do you want to continue? [Y/n] y
Get:1 http://asi-fs-n.my.host/ubuntu xenial/main amd64 powermgmt-base all 1.31+nmu1 [7,178 B]
...
Get:6 http://asi-fs-n.my.host/ubuntu xenial-updates/main amd64 unattended-upgrades all 1.1ubuntu1.18.04.7~16.04.3 [41.4 kB]
Fetched 199 kB in 0s (13.3 MB/s)
Preconfiguring packages ...
Selecting previously unselected package powermgmt-base.
(Reading database ... 58161 files and directories currently installed.)
Preparing to unpack .../powermgmt-base_1.31+nmu1_all.deb ...
Unpacking powermgmt-base (1.31+nmu1) ...
...
Selecting previously unselected package unattended-upgrades.
Preparing to unpack .../unattended-upgrades_1.1ubuntu1.18.04.7~16.04.3_all.deb ...
Unpacking unattended-upgrades (1.1ubuntu1.18.04.7~16.04.3) ...
Processing triggers for dbus (1.10.6-1ubuntu3.4) ...
Processing triggers for ureadahead (0.100.0-19.1) ...
Processing triggers for systemd (229-4ubuntu21.22) ...
Setting up powermgmt-base (1.31+nmu1) ...
...
Setting up xz-utils (5.1.1alpha+20120614-2ubuntu2) ...
update-alternatives: using /usr/bin/xz to provide /usr/bin/lzma (lzma) in auto mode
Setting up unattended-upgrades (1.1ubuntu1.18.04.7~16.04.3) ...

Creating config file /etc/apt/apt.conf.d/50unattended-upgrades with new version
Synchronizing state of unattended-upgrades.service with SysV init with /lib/systemd/systemd-sysv-install...
Executing /lib/systemd/systemd-sysv-install enable unattended-upgrades
Processing triggers for dbus (1.10.6-1ubuntu3.4) ...
Processing triggers for ureadahead (0.100.0-19.1) ...
Processing triggers for systemd (229-4ubuntu21.22) ...
root@vmi291775:~#
Once you have installed software-properties-common, you should update the system.
sudo apt-get update
Here is the output:
root@vmi291775:~# sudo apt-get update
Hit:1 http://asi-fs-n.my.host/ubuntu xenial InRelease
Hit:2 http://asi-fs-n.my.host/ubuntu xenial-updates InRelease
Hit:3 http://asi-fs-n.my.host/ubuntu xenial-backports InRelease
Get:4 http://security.ubuntu.com/ubuntu xenial-security InRelease [109 kB]
Fetched 109 kB in 0s (186 kB/s)
Reading package lists... Done
root@vmi291775:~#
Install the “apt-transport-https” to be able to download continent using https protocol.
sudo apt-get install apt-transport-https
Here is the output:
root@vmi291775:~# sudo apt-get install apt-transport-https
Reading package lists... Done
Building dependency tree
Reading state information... Done
The following NEW packages will be installed:
  apt-transport-https
0 upgraded, 1 newly installed, 0 to remove and 0 not upgraded.
Need to get 26.5 kB of archives.
After this operation, 216 kB of additional disk space will be used.
Get:1 http://asi-fs-n.my.host/ubuntu xenial-updates/main amd64 apt-transport-https amd64 1.2.32 [26.5 kB]
Fetched 26.5 kB in 0s (0 B/s)
Selecting previously unselected package apt-transport-https.
(Reading database ... 58274 files and directories currently installed.)
Preparing to unpack .../apt-transport-https_1.2.32_amd64.deb ...
Unpacking apt-transport-https (1.2.32) ...
Setting up apt-transport-https (1.2.32) ...
root@vmi291775:~#
Next you need to register the Microsoft SQL Server Ubuntu repository. If you want to try SQL Server 2019, you must instead register the Preview (2019) repository.
sudo add-apt-repository "$(wget -qO- https://packages.microsoft.com/config/ubuntu/16.04/mssql-server-preview.list)"
The SQL Server 2017 repository can be installed by the following command:
sudo add-apt-repository "$(wget -qO- https://packages.microsoft.com/config/ubuntu/16.04/mssql-server-2017.list)"
As told before I am going with the fresh new 2019 CTP 3.2.
Here is the output:
root@vmi291775:~# sudo add-apt-repository "$(wget -qO- https://packages.microsoft.com/config/ubuntu/16.04/mssql-server-preview.list)"
root@vmi291775:~#
Update the system again.
sudo apt-get update
Here is the output:
root@vmi291775:~# sudo apt-get update
Hit:1 http://asi-fs-n.my.host/ubuntu xenial InRelease
Hit:2 http://asi-fs-n.my.host/ubuntu xenial-updates InRelease
Hit:3 http://asi-fs-n.my.host/ubuntu xenial-backports InRelease
Hit:4 http://security.ubuntu.com/ubuntu xenial-security InRelease
Get:5 https://packages.microsoft.com/ubuntu/16.04/mssql-server-preview xenial InRelease [3,223 B]
Get:6 https://packages.microsoft.com/ubuntu/16.04/mssql-server-preview xenial/main amd64 Packages [17.0 kB]
Fetched 20.2 kB in 0s (28.2 kB/s)
Reading package lists... Done
root@vmi291775:~#
Install MS SQL Server
Now after all prerequisites are installed, we can finally install MS SQL Server. We can do it by running the following command:
sudo apt-get install -y mssql-server
The output is large but here is a part of it:
root@vmi291775:~# sudo apt-get install -y mssql-server
Reading package lists... Done
Building dependency tree
Reading state information... Done
The following additional packages will be installed:
  gawk gdb gdbserver libbabeltrace-ctf1 libbabeltrace1 libc++1 libc6-dbg
  libcc1-0 libmpfr4 libnuma1 libpython-stdlib libpython2.7-minimal
  libpython2.7-stdlib libsasl2-modules-gssapi-mit libsigsegv2
  libsss-nss-idmap0 libunwind8 python python-minimal python2.7
  python2.7-minimal
Suggested packages:
  gawk-doc gdb-doc clang python-doc python-tk python2.7-doc binutils
  binfmt-support
The following NEW packages will be installed:
  gawk gdb gdbserver libbabeltrace-ctf1 libbabeltrace1 libc++1 libc6-dbg
  libcc1-0 libmpfr4 libnuma1 libpython-stdlib libpython2.7-minimal
  libpython2.7-stdlib libsasl2-modules-gssapi-mit libsigsegv2
  libsss-nss-idmap0 libunwind8 mssql-server python python-minimal python2.7
  python2.7-minimal
0 upgraded, 22 newly installed, 0 to remove and 0 not upgraded.
Need to get 235 MB of archives.
After this operation, 1,145 MB of additional disk space will be used.
Get:1 http://asi-fs-n.my.host/ubuntu xenial/main amd64 libmpfr4 amd64 3.1.4-1 [191 kB]
...
Get:22 https://packages.microsoft.com/ubuntu/16.04/mssql-server-preview xenial/main amd64 mssql-server amd64 15.0.1800.32-1 [224 MB]
Fetched 235 MB in 15s (15.5 MB/s)
Preconfiguring packages ...
Selecting previously unselected package libmpfr4:amd64.
(Reading database ... 58280 files and directories currently installed.)
Preparing to unpack .../libmpfr4_3.1.4-1_amd64.deb ...
Unpacking libmpfr4:amd64 (3.1.4-1) ...
...
Selecting previously unselected package mssql-server.
Preparing to unpack .../mssql-server_15.0.1800.32-1_amd64.deb ...
Unpacking mssql-server (15.0.1800.32-1) ...
Processing triggers for libc-bin (2.23-0ubuntu11) ...
Setting up gawk (1:4.1.3+dfsg-0.1) ...
...
Setting up mssql-server (15.0.1800.32-1) ...

+--------------------------------------------------------------+
Please run 'sudo /opt/mssql/bin/mssql-conf setup'
to complete the setup of Microsoft SQL Server
+--------------------------------------------------------------+

Processing triggers for libc-bin (2.23-0ubuntu11) ...
root@vmi291775:~#
As you can see in the output itself, after the package installation finishes you must run mssql-conf setup and follow the prompts to
- choose your edition of the product - I chose the “Developer edition”,
- accept the license terms,
- set the SA password - Make sure to specify a strong password for the SA account (Minimum length 8 characters, including uppercase and lowercase letters, base 10 digits and/or non-alphanumeric symbols).
sudo /opt/mssql/bin/mssql-conf setup
Here is the output:
root@vmi291775:~# sudo /opt/mssql/bin/mssql-conf setup
usermod: no changes
Choose an edition of SQL Server:
  1) Evaluation (free, no production use rights, 180-day limit)
  2) Developer (free, no production use rights)
  3) Express (free)
  4) Web (PAID)
  5) Standard (PAID)
  6) Enterprise (PAID) - CPU Core utilization restricted to 20 physical/40 hyperthreaded
  7) Enterprise Core (PAID) - CPU Core utilization up to Operating System Maximum
  8) I bought a license through a retail sales channel and have a product key to enter.

Details about editions can be found at
https://go.microsoft.com/fwlink/?LinkId=852748&clcid=0x409

Use of PAID editions of this software requires separate licensing through a
Microsoft Volume Licensing program.
By choosing a PAID edition, you are verifying that you have the appropriate
number of licenses in place to install and run this software.

Enter your edition(1-8): 2
The license terms for this product can be found in
/usr/share/doc/mssql-server or downloaded from:
https://go.microsoft.com/fwlink/?LinkId=855862&clcid=0x409

The privacy statement can be viewed at:
https://go.microsoft.com/fwlink/?LinkId=853010&clcid=0x409

Do you accept the license terms? [Yes/No]:y

Enter the SQL Server system administrator password:
Confirm the SQL Server system administrator password:
Configuring SQL Server...

This is an evaluation version.  There are [151] days left in the evaluation period.
ForceFlush is enabled for this instance.
ForceFlush feature is enabled for log durability.
Created symlink from /etc/systemd/system/multi-user.target.wants/mssql-server.service to /lib/systemd/system/mssql-server.service.
Setup has completed successfully. SQL Server is now starting.
root@vmi291775:~#
You can check if the service is running by entering the following command:
systemctl status mssql-server --no-pager
Here is the output:
root@vmi291775:~# systemctl status mssql-server --no-pager
● mssql-server.service - Microsoft SQL Server Database Engine
   Loaded: loaded (/lib/systemd/system/mssql-server.service; enabled; vendor preset: enabled)
   Active: active (running) since Tue 2019-08-20 15:23:07 CEST; 2min 15s ago
     Docs: https://docs.microsoft.com/en-us/sql/linux
 Main PID: 2286 (sqlservr)
   CGroup: /system.slice/mssql-server.service
           ├─2286 /opt/mssql/bin/sqlservr
           └─2303 /opt/mssql/bin/sqlservr

Aug 20 15:23:13 vmi291775.my.host sqlservr[2286]: [387B blob data]
Aug 20 15:23:13 vmi291775.my.host sqlservr[2286]: [73B blob data]
Aug 20 15:23:13 vmi291775.my.host sqlservr[2286]: [77B blob data]
Aug 20 15:23:14 vmi291775.my.host sqlservr[2286]: [96B blob data]
Aug 20 15:23:14 vmi291775.my.host sqlservr[2286]: [66B blob data]
Aug 20 15:23:15 vmi291775.my.host sqlservr[2286]: [75B blob data]
Aug 20 15:23:15 vmi291775.my.host sqlservr[2286]: [96B blob data]
Aug 20 15:23:15 vmi291775.my.host sqlservr[2286]: [100B blob data]
Aug 20 15:23:15 vmi291775.my.host sqlservr[2286]: [71B blob data]
Aug 20 15:23:15 vmi291775.my.host sqlservr[2286]: [124B blob data]
root@vmi291775:~#
Great success, my first MS SQL Server on Linux is running!
Enable remote connections
More likely than using the command prompt I would like to connect on the instance using the well-known SSMS.
To be able to connect from the SSMS to the host first we need to open the SQL Server TCP port (default 1433) on your firewall.
Uncomplicated Firewall (UFW) should be installed to be able to open a port:
sudo apt install ufw
Here is the output:
root@vmi291775:~# sudo apt install ufw
Reading package lists... Done
Building dependency tree
Reading state information... Done
The following additional packages will be installed:
  iptables libnfnetlink0
The following NEW packages will be installed:
  iptables libnfnetlink0 ufw
0 upgraded, 3 newly installed, 0 to remove and 0 not upgraded.
Need to get 428 kB of archives.
After this operation, 2,562 kB of additional disk space will be used.
Do you want to continue? [Y/n] y
Get:1 http://asi-fs-n.my.host/ubuntu xenial/main amd64 libnfnetlink0 amd64 1.0.1-3 [13.3 kB]
Get:2 http://asi-fs-n.my.host/ubuntu xenial/main amd64 iptables amd64 1.6.0-2ubuntu3 [266 kB]
Get:3 http://asi-fs-n.my.host/ubuntu xenial/main amd64 ufw all 0.35-0ubuntu2 [149 kB]
Fetched 428 kB in 0s (15.2 MB/s)
Preconfiguring packages ...
Selecting previously unselected package libnfnetlink0:amd64.
(Reading database ... 59806 files and directories currently installed.)
Preparing to unpack .../libnfnetlink0_1.0.1-3_amd64.deb ...
Unpacking libnfnetlink0:amd64 (1.0.1-3) ...
Selecting previously unselected package iptables.
Preparing to unpack .../iptables_1.6.0-2ubuntu3_amd64.deb ...
Unpacking iptables (1.6.0-2ubuntu3) ...
Selecting previously unselected package ufw.
Preparing to unpack .../ufw_0.35-0ubuntu2_all.deb ...
Unpacking ufw (0.35-0ubuntu2) ...
Processing triggers for libc-bin (2.23-0ubuntu11) ...
Processing triggers for ureadahead (0.100.0-19.1) ...
Processing triggers for systemd (229-4ubuntu21.22) ...
Setting up libnfnetlink0:amd64 (1.0.1-3) ...
Setting up iptables (1.6.0-2ubuntu3) ...
Setting up ufw (0.35-0ubuntu2) ...

Creating config file /etc/ufw/before.rules with new version

Creating config file /etc/ufw/before6.rules with new version

Creating config file /etc/ufw/after.rules with new version

Creating config file /etc/ufw/after6.rules with new version
Processing triggers for libc-bin (2.23-0ubuntu11) ...
Processing triggers for ureadahead (0.100.0-19.1) ...
Processing triggers for systemd (229-4ubuntu21.22) ...
root@vmi291775:~#
Let's allow the TCP 1433 port now:
sudo ufw allow 1433/tcp
Here is the output:
root@vmi291775:~# sudo ufw allow 1433/tcp
Rules updated
Rules updated (v6)
root@vmi291775:~#
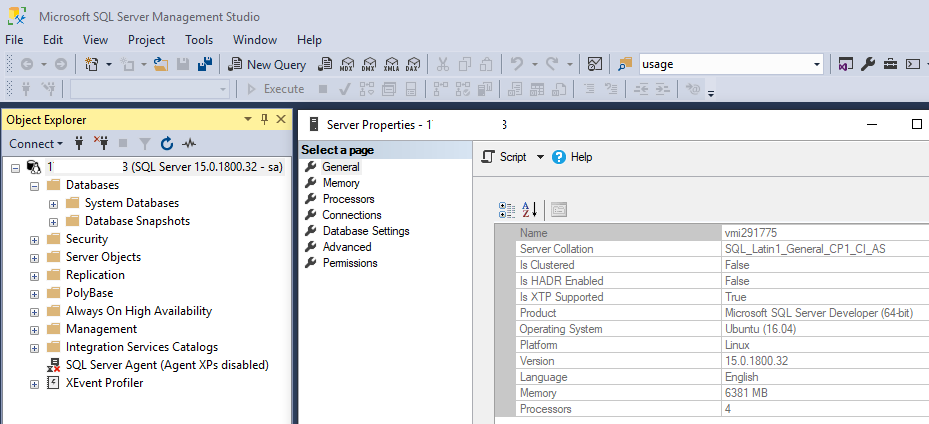
Let’s open SSMS and connect to our newly installed and configured MS SQL instance on Linux.
Additional components (optional SQL Server features)
After installation, you can also install or enable optional SQL Server features.
- SQL Server command-line tools - If you like the old-fashioned command prompt like interface, you can install the “SQL Server command-line tools”. Instructions on how to do it you can find on the official SQL Docs here,
- SQL Server Agent - You can find detailed instructions here,
- SQL Server Full Text Search - You can find detailed instructions here,
- Machine Learning Services (R, Python) - You can find detailed instructions here,
- SQL Server Integration Services - You can find detailed instructions here.
Here you can find my steps to be able to configure SQL Server Agent and SQL Server Full Text Search because i will need them.
SQL Server Agent
From MS SQL Versions 2017 CU4 and above SQL Server agent must be just enabled, and the MS SQL service must be restarted.
sudo /opt/mssql/bin/mssql-conf set sqlagent.enabled true
sudo systemctl restart mssql-server
Here is the output:
root@vmi291775:~# sudo /opt/mssql/bin/mssql-conf set sqlagent.enabled true
SQL Server needs to be restarted in order to apply this setting. Please run
'systemctl restart mssql-server.service'.
root@vmi291775:~# sudo systemctl restart mssql-server
root@vmi291775:~#
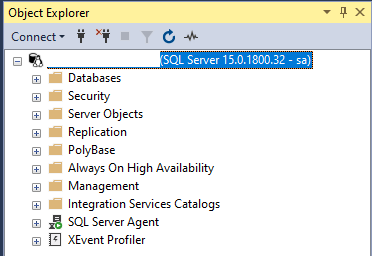
You will see that the SQL Server agent is now running.
SQL Server Full Text Search
SQL Server Full Text Search feature must be installed and the service must be restarted to be able to use it.
sudo apt-get update
sudo apt-get install -y mssql-server-fts
sudo systemctl restart mssql-server
The output is large but here is a part of it:
root@vmi291775:~# sudo apt-get update
Hit:1 http://asi-fs-n.contabo.net/ubuntu xenial InRelease
...
Get:13 http://security.ubuntu.com/ubuntu xenial-security/main Translation-en [285 kB]
Fetched 5,548 kB in 1s (3,139 kB/s)
Reading package lists... Done
root@vmi291775:~# sudo apt-get install -y mssql-server-fts
Reading package lists... Done
Building dependency tree
Reading state information... Done
The following NEW packages will be installed:
  mssql-server-fts
0 upgraded, 1 newly installed, 0 to remove and 0 not upgraded.
Need to get 240 MB of archives.
After this operation, 581 MB of additional disk space will be used.
Get:1 https://packages.microsoft.com/ubuntu/16.04/mssql-server-preview xenial/main amd64 mssql-server-fts amd64 15.0.1800.32-1 [240 MB]
Fetched 240 MB in 12s (18.6 MB/s)
Selecting previously unselected package mssql-server-fts.
(Reading database ... 60082 files and directories currently installed.)
Preparing to unpack .../mssql-server-fts_15.0.1800.32-1_amd64.deb ...
Unpacking mssql-server-fts (15.0.1800.32-1) ...
Setting up mssql-server-fts (15.0.1800.32-1) ...

+-------------------------------------------------------------------------------------+
Please restart mssql-server to enable Microsoft SQL Server Full Text Search.
+-------------------------------------------------------------------------------------+

root@vmi291775:~# sudo systemctl restart mssql-server
root@vmi291775:~#